
About 3D Reverse Engineering
What exactly do we do?
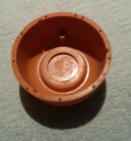
The ideas behind 3D Reverse Engineering are deeply rooted in my mechanical engineering study and 30 years experience with computer aided design (CAD). Our goal is to make our clients ideas come to life. We do this by producing fully functioning (realistic) prototypes rather than a dumb 3D model. In order to make our clients idea come to life we use some relatively new engineering technology. Our 3D printer uses a technique we first encountered in the early 90′s when such printers cost 500,000 pounds (yes, my origins are in the UK). Much progress has been made since these early days and within a few hours we can now create accurate, hard and durable plastic parts. An innovative design is the foundation for any new product and we make heavy use of various engineering design tools to be able to produce the necessary 3D models, from which we later create the prototypes. Being able to take a design brief and turn it into a 3 dimension model is core to what we do. Often for our clients its the first time they get to visualize their idea in a tangible form. The design software gives us the ability to create an image that is more like a photo than a computer generated 3D model. More and more often our projects begin by capturing the details of an existing product or form. We refer to this as Reverse Engineering. We utilize 3D scanning to capture an image of the existing part that we can then enhance using our engineering design software and later send to the 3D printer to create the new prototype. We have one scanner primarily for engineering components (engines parts etc.), which uses a laser to capture the 3D image and recently we added a second scanner that use a light to project a pattern onto the item to be scanned. We will use this scanner to capture faces, hands, feet, statues etc. Last month, we were contacted by a client, who needed to quickly replace a key part of a machine used in daily production. The main controller had broken and due to the age of the machine a replacement part was not available. We used our 3D scanner to capture what was left of the control knob and we used this data as a template for a new and updated model. Based on our experience we filled in the gaps in the model, literally. Within three days we were able to re-construct the control knob, print the new part and send it along with the original back to our client. This reverse engineering project used 3D scanning and printing to save substantial time and costs for our client associated with having a production tool out of service and potential delays in delivers.
© 3D Reverse Engineering 2013


About 3D Reverse Engineering
What exactly do we do?
The ideas behind 3D Reverse Engineering are deeply rooted in my mechanical engineering study and 30 years experience with computer aided design (CAD). Our goal is to make our clients ideas come to life. We do this by producing fully functioning (realistic) prototypes rather than a dumb 3D model. In order to make our clients idea come to life we use some relatively new engineering technology. Our 3D printer uses a technique we first encountered in the early 90′s when such printers cost 500,000 pounds (yes, my origins are in the UK). Much progress has been made since these early days and within a few hours we can now create accurate, hard and durable plastic parts. An innovative design is the foundation for any new product and we make heavy use of various engineering design tools to be able to produce the necessary 3D models, from which we later create the prototypes. Being able to take a design brief and turn it into a 3 dimension model is core to what we do. Often for our clients its the first time they get to visualize their idea in a tangible form. The design software gives us the ability to create an image that is more like a photo than a computer generated 3D model. More and more often our projects begin by capturing the details of an existing product or form. We refer to this as Reverse Engineering. We utilize 3D scanning to capture an image of the existing part that we can then enhance using our engineering design software and later send to the 3D printer to create the new prototype. We have one scanner primarily for engineering components (engines parts etc.), which uses a laser to capture the 3D image and recently we added a second scanner that use a light to project a pattern onto the item to be scanned. We will use this scanner to capture faces, hands, feet, statues etc. Last month, we were contacted by a client, who needed to quickly replace a key part of a machine used in daily production. The main controller had broken and due to the age of the machine a replacement part was not available. We used our 3D scanner to capture what was left of the control knob and we used this data as a template for a new and updated model. Based on our experience we filled in the gaps in the model, literally. Within three days we were able to re-construct the control knob, print the new part and send it along with the original back to our client. This reverse engineering project used 3D scanning and printing to save substantial time and costs for our client associated with having a production tool out of service and potential delays in delivers.
© 3D Reverse Engineering 2019


